Seamless Windows Virtualization
Sun, Apr 27, 2008 with tags virtualbox , remote desktop , seamless , desktop , windows , virtualization , linux , vmwareVirtualization of desktop operating systems is pretty commonplace for users of Linux and Mac OS. Initial implementations of desktop virtualization, such as VMWare 1.0, had the guest operating system running in complete isolation. Interaction was done through a custom application or network applications. There was no support for sharing files, sharing a clipboard, or merging the windowing environments.
Since then, virtualization has come a very long way. With VMWare and a supported guest operating system, the clipboards are the same, the mouse isn’t locked to a window, and files are easily shared between operating system. Sadly, merging of windowing environments still isn’t quite there. Your guest desktop still runs completely in a window on the host. VMWare has a new technique available in Fusion, their Mac product, called Unity that allows this. Parallels supports a similar feature called Cohesion, and I’ve been told that VirtualBox supports this feature too. This is a fine feature, if you have one of the newer products that supports this. If you’re like me and still using VMWare Player, an older version of VMWare workstation, or connecting to remote windows systems with remote desktop, this isn’t a native feature. Luckily, it’s a pretty easy hack to get seamless windows.
Enter SeamlessRDP from Cendio. This little program extends the standard RDP system a little bit to provide for complete desktop integration when using rdesktop. It works in conjunction with rdesktop, so other tools such as tsclient won’t work. Unfortunately, the directions for this aren’t always the most clear, and they didn’t work with my instance of VMWare, so here’s how I managed to do it. These instructions are specific to Windows XP Pro.
1. First, go and download seamlessrdp.zip and extract it to something like c:\windows. There should be three files in there, the one that we really care about is seamlessrdpshell.exe.
2. Make sure that that you allow remote connections, go to control panel->system->remote and check “Allow users to remotely connect to this computer”. At this point, you’ll be able to test a remote desktop connection to your virtual machine through the command rdesktop REMOTESERVERIP. You’ll notice that you’re still running everything in still running a single window because we haven’t invoked seamlessrdpshell yet.
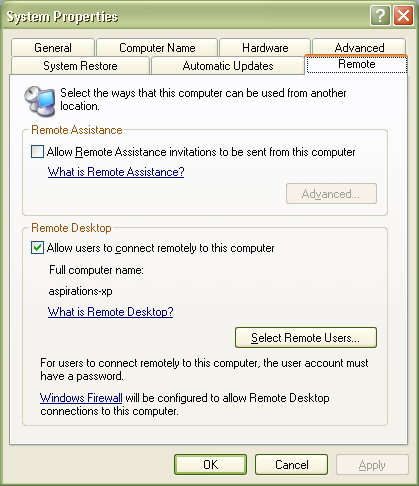
Enable "Allow users to remotely connect to this computer
3. Enable welcome screen and fast user switching – this is something that you normally don’t see in enterprise deployments, but apparently it is necessary for this. I can’t figure out how to make it work without this. Go to control panel->user accounts and check both of the options.
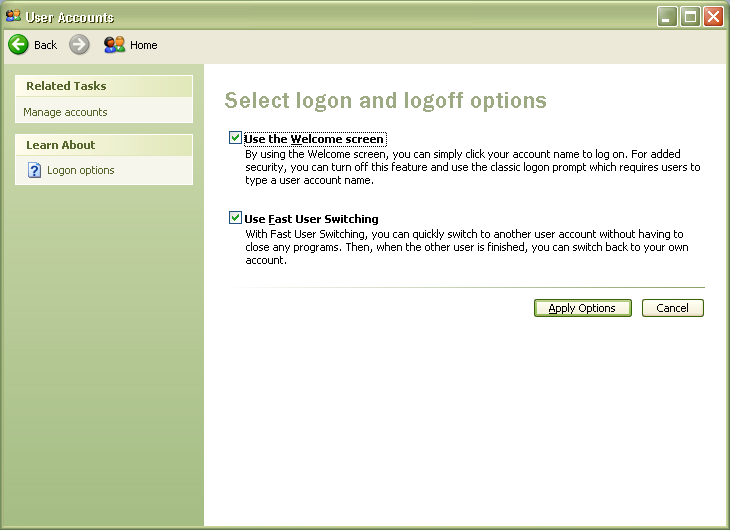
Check both options on the user account settings screen
4. Tell Explorer to not draw the desktop – the reason is pretty simple, if explorer drew the desktop the window would still be full screen. We can change this by creating a new registry in My Computer\HKEY_CURRENT_USER\Software\Microsoft\Windows\CurrentVersion\Policies\Explorer. Call it NoDesktop, and make it a DWORD with a value of 1. This will keep explorer from drawing the desktop.
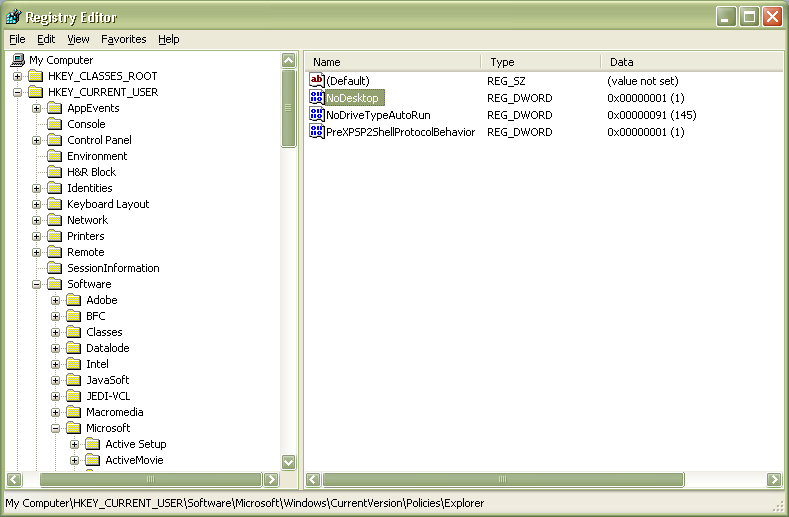
Create a new DWORD registry entry called NoDesktop with a value of 1
5. Here comes some of the stranger stuff, that you may not need to do, but I found necessary for my system and it wasn’t properly documented anywhere. In most cases, you can specify an application to run with the -s option to rdesktop, unfortunately, this doesn’t work on my system. Instead, we’ll need to use a rarely used program that allows you to set system level policies. Go to start->run and enter gpedit.msc. Select User Configuration->Administrative Templates->Windows Components->Terminal Services.
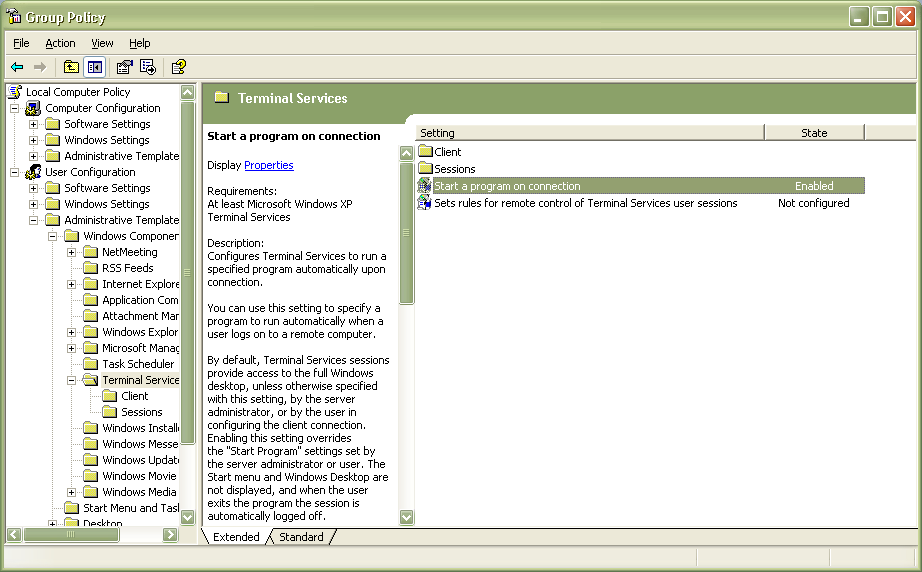
Run gpedit.msc and navigate down to User Configuration->Administrative Templates->Windows Components->Terminal Services.
Now, the crutch that we’ll use to select “Start a program on connection”. Double click and check the Enabled box and enter in c:\windows\seamlessrdpshell.exe c:\windows\explorer.exe. Click apply and then exit.
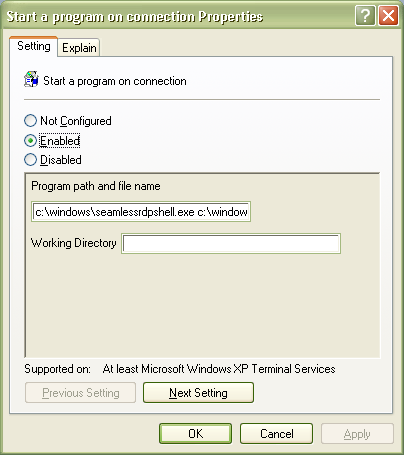
Enter c:\windows\seamlessrdpshell.exe c:\windows\explorer.exe for the command to run on connection.
6. At this point, if you log out, everything should work, but the graphics may be a bit funny. In my experience I’ve found that there are two more small changes necessary before everything works nicely. First, make sure you’re using the Windows XP appearance and not the classic appearance. Second, uncheck the option to keep the task bar on top, as this will cause issues when maximizing windows applications. And finally, you can’t have another panel on the bottom or the start bar will try to redraw itself poorly, over and over.
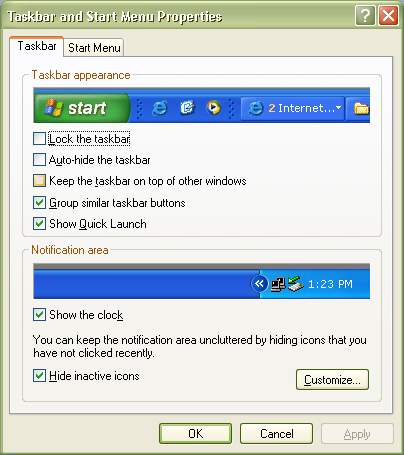
Uncheck the option to keep the taskbar on top
7. Now, all you need to do is make sure you’re logged out of the virtual machine, and execute the following command: rdesktop -r sound:local -A REMOTESERVERIP:3389 -u "WINDOWSUSER" -p "WINDOWSPASSWORD". If everything goes well you should get a nice little windows start menu at the bottom of the screen and your windows apps will run seamlessly. It’s not 100% perfect, but any sort of virtualization, especially a hack like this, never is. In particular, sloppy focus causes windows programs to jump to the front. But other things work great, like a shared clipboard and sound. It makes working in both worlds lots easier.
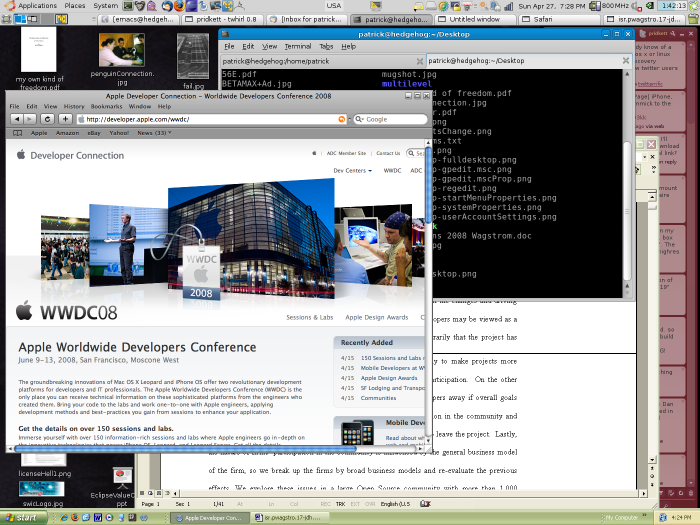
The final product